ElectricMotorcycleForum.com

  • April 23, 2024, 11:51:07 PM
  • Welcome, Guest
Please login or register.

Login with username, password and session length
Advanced search  

News:

Electric Motorcycle Forum is live!

Pages: [1] 2

Author Topic: Domino Throttle Installation  (Read 9038 times)

rayivers

  • Hero Member
  • *****
  • Posts: 502
  • electric feels so right
    • View Profile
Domino Throttle Installation
« on: November 22, 2015, 07:08:36 PM »

I got the Domino throttle onto the MX last week.  I like it!  The quicker action makes it a little easier to both accelerate & brake, with less arm pump.  It feels a bit faster too, which is surely my imagination.

These were kinda hard to find for a while, but EVDrives and Electric Motorsport have them in stock again, as of a few weeks ago anyway.  I got one each of the IP54 (water-resistant) and IP67 (waterproof to 3m) units, which are identical except for pots and feel exactly the same when turned; I used the IP67.  The Domino has about 78° or so of rotation - it's hard to measure exactly, but the Magura is 90° - along with a slightly smoother feel and longer throttle tube. With a little finessing it fit flush against the kill/mode switch with the tube & bar ends even.  It's more crowded than I'd like, but at least I don't have to move the switch to the LH side (yet).


Magura (top) & Domino:


The OEM Magura cable is 23.5" long to reach the harness connector above the F battery bay, but the Domino's was only 15" which barely reached my key switch. :(  The easiest way to make it work is by adding an extender cable to the large 5-pin connector that comes with the new throttle, but I didn't want the extra set of contacts or microswitch connections so I replaced the entire cable.  If you're planning on using the microswitch, you may want to go a different route.

Here's a before & after shot:


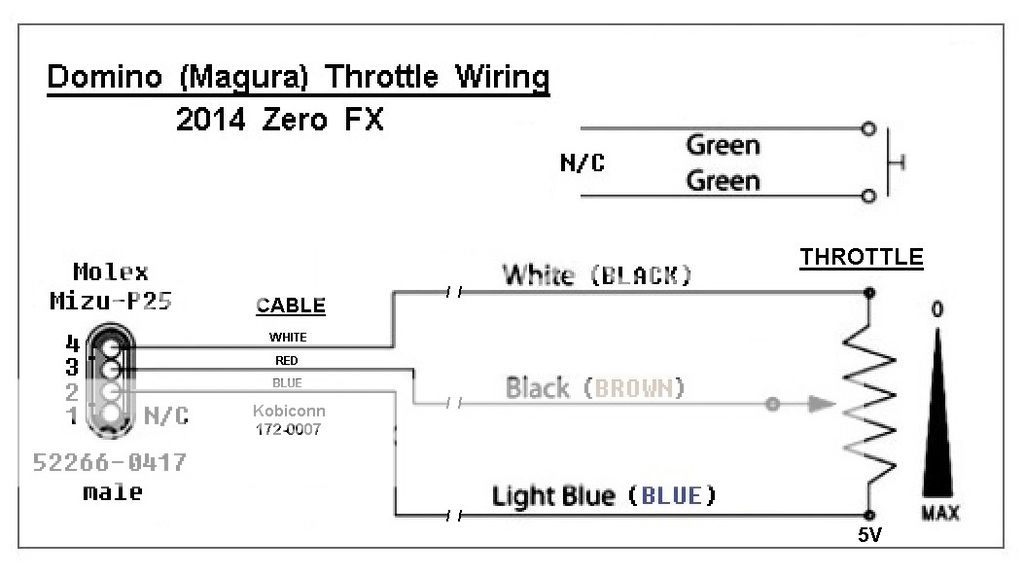
To mate the Domino's 5k pot to the '14 FX harness throttle connector the following items are required (I used Mouser Electronics for convenience):

Molex 'Mizu-P25' 4-pin male connector (Molex P/N 52266-0417)
3 male terminals for above (50147-8100)
extra cable (I used a Kobiconn P/N 172-0007 DIN cable, which worked great)
T10 Torx driver for Domino cable cover (had this already)

I also got these for testing, which came in real handy:

Mizu-P25 4-pin female connector (52213-0417)
3 female terminals for above (50148-8100)

I did the female first with some short pigtails as a practice run, which turned out to be a very good idea. ;)  If you're experienced with small crimp terminals and thin wire it should be relatively easy, but it had been years since I'd done anything similar and it could've gone smoother at first.

Here's the wiring I used (see diagram below - ignore Magura wire colors in parentheses):

Domino white ("0V") wire to cable white wire / connector pin 4
Domino black (pot wiper) to cable red  / pin 3
Domino blue (5V) to cable blue / pin 2


Here's what I did, in excessive detail:

1) Starting with the already-stripped end of the Kobiconn cable, I cut the wires to @ 20mm long, stripped 3mm of insulation off the red / white / blue wire ends (26 AWG), snipped off the braid & unused yellow wire, then pre-tinned the copper.

2) Slip the Molex water seal & snap-on cap onto the wire ends, with the large flange end of seal & cap snap protrusions facing the tinned ends.

3) Crimp & solder the terminals onto the wires. The outermost (wire side) terminal crimp ears grab the wire insulation, not the conductor.  These must be carefully wound around the insulation for minimum O.D. and then crimped, or they may snag on the connector's terminal tunnel during insertion. The inner contact-side crimp ears grab only the conductor. These are shorter and can be 'squashed' straight across L to R without insertion-clearance issues. Try to use the minimum amount of solder and heat, as the thin metal can warp & excess solder can wick up to the terminal contact and ruin it.

4) Make sure the terminals are oriented correctly before insertion; these are flimsy little things that lock in position, and you may only get one shot at it.  Both male and female terminals should be inserted into the connectors so that the formerly-open (now crimped) ends of the crimp ears are facing the side of the connector with the '1' pin-1 raised mark (see photo below of male connector's cable side, '1' is on top, uncrimped terminal properly oriented in unused #1 pin position).  Molex calls them "low insertion force", which is true only if the crimping/soldering is done correctly and the terminals haven't deformed from the heat.


5) Once all three terminals have clicked into position (leave the pin 1 position empty, as Zero uses a sealing pin in the female harness connector), snap the seal & cap into the connector body.

6) I cut the cable to @ 26", stripped @ 20mm of outer jacket & 10mm insulation off the R / W / B wire ends, braid & yellow wire off, then pre-tinned the copper again.

7) Back to the connector end - I coated the cable-jacket end / wires / connector's wire side with Liquid Tape electrical sealant, then put heat shrink over all of it. This appears to be what Zero did with the OEM Magura connector, and I've read far too much here re water-related problems to screw around. :)

8 ) At the throttle, I removed the cable cover & cut off the green microswitch wires at @ 20mm long,  then tucked them back into their cavity in case I needed them later (as mentioned earlier, you may want to do something different).  I cut all 3 pot wires at @ 20mm, then stripped / tinned / twisted them to the cable wires, soldered them, trimmed them down, & Liquid Taped / heatshrinked them individually, with the heatshrink holding the spliced ends tightly together.  There's not much room in there, so keep things as short as possible.

9) Finally, I tie-wrapped the cable end to the throttle body as done originally (visible in pics 1 & 4 above), slid the cover back on (it's tight on the cable, be careful) & screwed it back onto the throttle, then lubed the tube I.D. only with liquid PTFE/Teflon and slid it onto the dry bar end.

If Domino had spec'd a 24" cable, this process would've been so much easier.

Gratuitous bike selfie:


Ray

Logged
'14 Zero FX 5.7 (now 2.8, MX), '14 Zero FX 2.8 (street), '19 Alta MXR, '18 Alta MXR, various '74 - '08 ICE dirt bikes

mrwilsn

  • Hero Member
  • *****
  • Posts: 693
  • 2014 Zero S / 2017 Zero SR
    • View Profile
Re: Domino Throttle Installation
« Reply #1 on: November 22, 2015, 07:55:18 PM »

It's amazing how much more badass the FX looks with a proper set of off road tires and the license plate holder and tail/turn signals removed!

So the reason for the throttle change is for a shorter turn of the grip?

Sent from my XT1060 using Tapatalk

Logged
2014 Zero S

rayivers

  • Hero Member
  • *****
  • Posts: 502
  • electric feels so right
    • View Profile
Re: Domino Throttle Installation
« Reply #2 on: November 22, 2015, 08:29:08 PM »

Absolutely - I even like the headlights.  My FX seems like such a street bike in comparison.

Yes, it was mainly the quicker-turn thing, but also just curiosity. The Domino definitely seems like a higher-quality unit than the Magura, which now feels loose and somewhat 'notchy' in comparison.  I was also hoping the Domino would be thinner and allow the brake lever to overhang the grip more, but with that inner tube ring holding the grip away from the throttle body everything's about the same.

Ray
Logged
'14 Zero FX 5.7 (now 2.8, MX), '14 Zero FX 2.8 (street), '19 Alta MXR, '18 Alta MXR, various '74 - '08 ICE dirt bikes

rayivers

  • Hero Member
  • *****
  • Posts: 502
  • electric feels so right
    • View Profile
Re: Domino Throttle Installation
« Reply #3 on: December 14, 2015, 02:18:02 AM »

Quote
It feels a bit faster too, which is surely my imagination.

I've gotten a bunch more rides in with this throttle now, and it wasn't my imagination - the bike actually is faster.  I've been noticing all sorts of things - missing my braking points and nearly overshooting fast corners, catching air over jumps I never got before, and today nearly looping the bike cresting a small rise where I was lucky to get a 12" "wheelie" before.  Obviously no actual additional max torque is being created, but the available torque has definitely been redistributed to create a different throttle response, kind of like having a 'SuperSport' mode.

I think it may be two things; the pot has a slightly faster taper than the Magura's unit (I noticed this during initial measurements, but didn't think much of it), and the reduced rotation may be causing my normal wrist-twist to continually hit the 'sweet spot' in the throttle rotation where '14 2.8 FX's get a burst of power prior to current-limiting kicking in (the 5.7 just continues to pull at this point, without limiting or any burst).  The effect is very real, to the point where I have to be careful in certain places or I'll end up in the trees, or the lake. :)

I'm not sure exactly how other Zero models would be affected, but I seriously doubt they'd feel slower.

Ray
Logged
'14 Zero FX 5.7 (now 2.8, MX), '14 Zero FX 2.8 (street), '19 Alta MXR, '18 Alta MXR, various '74 - '08 ICE dirt bikes

Doug S

  • Hero Member
  • *****
  • Posts: 1626
    • View Profile
Re: Domino Throttle Installation
« Reply #4 on: December 14, 2015, 04:02:55 AM »

I'm not sure exactly how other Zero models would be affected, but I seriously doubt they'd feel slower.

My '14 SR definitely felt perkier when I put on the Domino (and replaced the grips). I chalked it up to the faster action, which I think really is the case. It just kicks in faster now, so it felt livelier with my previously-programmed reactions. I've had a couple thousand miles on the Domino, and it just feels normal now.
Logged
There's no better alarm clock than sunlight on asphalt.

rayivers

  • Hero Member
  • *****
  • Posts: 502
  • electric feels so right
    • View Profile
Re: Domino Throttle Installation
« Reply #5 on: December 14, 2015, 05:06:43 AM »

Quote
I've had a couple thousand miles on the Domino, and it just feels normal now.

Yes, that will surely happen with me too (sigh) - here's hoping this honeymoon period will last a while longer.  I remember when I first got the Zero, I was sure I'd never really get used to the continuous hard acceleration from very low speeds; a year later I was looking for more. ;)

Ray
Logged
'14 Zero FX 5.7 (now 2.8, MX), '14 Zero FX 2.8 (street), '19 Alta MXR, '18 Alta MXR, various '74 - '08 ICE dirt bikes

Cortezdtv

  • Sr. Member
  • ****
  • Posts: 490
    • View Profile
Re: Domino Throttle Installation
« Reply #6 on: December 14, 2015, 08:01:44 AM »

I'm just gonna start posting


And then.... On your threads


8)


I thought the exact same thing damn this thing pulls hard.... Months later trying to make it faster.... Ugh
Logged
"I keep it real!"
Not endorsed by:
Zero motorcycles

07 Electricross
And a family of pre 14 Zero X's

rayivers

  • Hero Member
  • *****
  • Posts: 502
  • electric feels so right
    • View Profile
Re: Domino Throttle Installation
« Reply #7 on: April 01, 2016, 02:30:47 AM »

WARNING - be sure to periodically check the screws for tightness !!

Today I got back from a ride and was moving the bike around in the garage, and boom - off came the throttle!  This happened to a girlfriend of mine while riding back in the 80's, she went down hard in traffic and broke her wrist (could've been much worse).  The top screw was almost completely out and hanging by a thread or two, while the bottom one was still pretty tight.

I think the problem is that the internal rubber bumper gets squashed down flat over a few months' time and one or both screws get loose, even though the bumper still grips the bar and prevents the throttle from sliding off easily.  My bumper is flattened down to a nub, and I'm now able to tighten both screws completely tight (I wasn't before, I would've stripped the threads if I did).

Ray
Logged
'14 Zero FX 5.7 (now 2.8, MX), '14 Zero FX 2.8 (street), '19 Alta MXR, '18 Alta MXR, various '74 - '08 ICE dirt bikes

Judaslefourbe

  • Newbie
  • *
  • Posts: 42
    • View Profile
Re: Domino Throttle Installation
« Reply #8 on: April 01, 2016, 08:54:19 PM »

I would recommend you put tape under it so the plastic housing can dig into it rather than slip around the handlebar.
Logged

MrDude_1

  • Hero Member
  • *****
  • Posts: 1146
    • View Profile
Re: Domino Throttle Installation
« Reply #9 on: April 01, 2016, 09:03:58 PM »

WARNING - be sure to periodically check the screws for tightness !!

Today I got back from a ride and was moving the bike around in the garage, and boom - off came the throttle!  This happened to a girlfriend of mine while riding back in the 80's, she went down hard in traffic and broke her wrist (could've been much worse).  The top screw was almost completely out and hanging by a thread or two, while the bottom one was still pretty tight.

I think the problem is that the internal rubber bumper gets squashed down flat over a few months' time and one or both screws get loose, even though the bumper still grips the bar and prevents the throttle from sliding off easily.  My bumper is flattened down to a nub, and I'm now able to tighten both screws completely tight (I wasn't before, I would've stripped the threads if I did).

Ray

yeah, I had that happen to me once.. the throttle almost came off the clipon as I was turning into a corner. Thankfully I didnt crash, but it was a scramble to first recover from the sudden throttle chop, and re-grip to get some brakes on...

Elsewhere on this board someone asked about regular maintenance, and while I know it came off as long and wordy, this is exactly what I was talking about when I said "check all fasteners on a regular basis".. clipons, levers, throttle, gauges, lights, seat, etc.. they all may come loose slowly.
Logged

BeezrGeezr

  • Newbie
  • *
  • Posts: 25
    • View Profile
Re: Domino Throttle Installation
« Reply #10 on: April 03, 2016, 02:50:16 AM »

My 2016 FX has 'tamper resistant' fasteners on the throttle housing. What's up with that?
Logged

rayivers

  • Hero Member
  • *****
  • Posts: 502
  • electric feels so right
    • View Profile
Re: Domino Throttle Installation
« Reply #11 on: April 03, 2016, 04:40:24 AM »

It might be to keep those with only ICE-bike experience from taking the throttle apart and possibly screwing it up.

Ray
Logged
'14 Zero FX 5.7 (now 2.8, MX), '14 Zero FX 2.8 (street), '19 Alta MXR, '18 Alta MXR, various '74 - '08 ICE dirt bikes

dahlheim

  • Jr. Member
  • **
  • Posts: 94
    • View Profile
Re: Domino Throttle Installation
« Reply #12 on: July 13, 2017, 06:44:17 AM »

dead thread but just to add to the database, i easily and successfully installed a domino throttle in place of stock on my '14 FX today, and i'm impressed as suggested.  better build, feels more solid, less throw.  thanks!
Logged
currently, 12 Zero DS ZF9, 07CRF450X, 03GL1800, 02R1150GS, 01XR650R, 00XR400R, 76GL1000

odedmaz

  • Full Member
  • ***
  • Posts: 221
    • View Profile
Re: Domino Throttle Installation
« Reply #13 on: July 13, 2017, 10:16:04 AM »

I also installed the Domino throttle on my 14 FX.
Agree about the better feel and the more limited range of motion, which makes it more comfortable and nimble.

That said, the Magura was fine and there are no real major differences.

Sent from my XT1585 using Tapatalk

Logged

BrianTRice@gmail.com

  • Unofficial Zero Manual Editor
  • Hero Member
  • *****
  • Posts: 4014
  • Nerdy Adventurer
    • View Profile
    • Personal site
Re: Domino Throttle Installation
« Reply #14 on: July 13, 2017, 10:42:11 PM »

For reference, the unofficial wiki manual indexes these explanations but no one has transcribed them over yet: http://zeromanual.com/index.php/Advanced_Modifications#Throttle_Upgrade
Logged
Current: 2020 DSR, 2012 Suzuki V-Strom
Former: 2016 DSR, 2013 DS
Pages: [1] 2